Showing posts with label sewing. Show all posts

Friday, April 20, 2012

Knickers and Roses {Project Run and Play}

Wow..can you believe it has been another week again?! Welcome, if you are here for the first time. Hope you will stay and look around for a bit!  I was so excited when I heard that Week 2 for Project Run and Play was Sportswear.  The first thing that came to my mind was a modern, yet vintage golfer.  Funny how my brain works sometimes, but I ran with it, and this is what I came up with:


My husband was the genius behind the name of the outfit this week. Don't you love it?
 My biggest goal this week was to make the clothes comfortable, interchangeable, and easy to move in.  
When I was a little girl, I wore knickers constantly. I love them because you can wear them in the spring and summer with no socks or in the winter and fall with socks and they work! The knickers were made from a lightweight cotton (we do live in Las Vegas, so I wanted to make sure my daughter could wear them year round!).  I added the button detailing on front to give it more of a vintage feel and they ended up being one of my favorite details!  I also adore the button closures at the knee.

Next up is the shirt. It was made with a lightweight knit, so I doubled it so it wasn't transparent. It is a very simple shirt, but by far my favorite detail is the pleating detail I put on the shoulder. I love that she can wear this plain as well and show that off!


Last we have a sweet little vest. I knew I wanted to pleat the bottom and by lining it in a contrasting fabric, you can catch little glimpses as she moves..love that! This was made from a t shirt pattern. I left off the sleeves and then cut the front right down the middle and then made the new shape!


Lastly I made some sweet hair accessories and a belt that coordinated and brought everything together. These belts are so fun to make. You can find my tutorial for them HERE. They are so great to add to any outfit for a pop of color.


And here are a few outtakes from the shoot. My daughter had such a great time swinging that vintage wooden club around.

Not a bad swing form for a 3 year old, right?! (Maybe I'll get to make more golfing outfits in the future...):)
So there you have it..a bit of what went into this week. I'd LOVE your vote over at Project Run and Play. You can vote through Sunday evening!

And of course, here is the paper doll outfit this week:

How cute is she? Find the outfit HERE.

Remember, free downloads are for likers of the NEW Kiki and Company page on Facebook. You can find the page HERE. Thanks!

Thanks for stopping by.

Pin It

Friday, April 13, 2012

I'm A Fox Dress..Project Run and Play

For those of you here from Project Run and Play, welcome! It is so fun to have made some new friends from this experience already and can't wait to meet more.  For those who don't know, I was invited to take part in an online sewing competition for children, Project Run and Play, where each week designers have a theme to design an outfit around and then are voted on each Friday and Saturday to determine the winner!  Head on over to Project Run and Play and check it out and VOTE! I'd love your vote, but know there are a lot of talented designers this season, so head on over for some great inspiration.

This week our theme was to remix the Circle Skirt by Dana from Made.

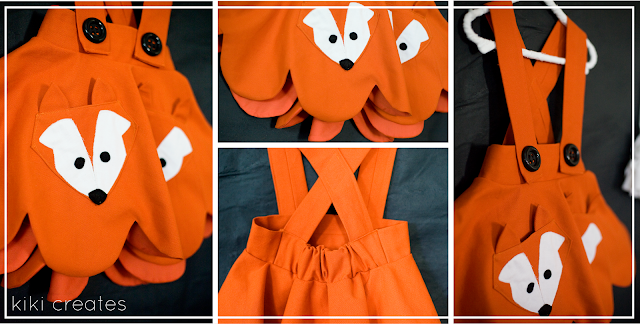
The circle skirt is such a great skirt to sew...for all sewers, but is a great beginning project for someone just learning to sew.  I LOVE the drape on this skirt and as part of my design, that is one thing that I knew I wanted to keep. Here is my original design in sketch format:


and here is what it turned into: 


My daughter is bursting to the brim with personality and  I love to make outfits to show it off. She was so funny for this photo shoot as you can see, but it really was perfect for the feel I was going for!

In remixing the pattern, I kept the skirt base the same, but added large scallops along the bottom.  The skirt is made from a denim and lined with a cotton, which made the scallops so easy to make. You will laugh when you hear how I do things sometimes. (My husband laughs a lot!):) To make the scallops, I searched my house high and low for every circle we had and found the perfect bowl that fit the size scallop I needed to make an even amount of scallops. Unconventional? Certainly. Did it work? Yes, it did!  I made a simple band for a waistband with a plain front and added elastic to the back. 2" suspenders were made and attached in the back, criss crossed and then snap close in the front. The large buttons were must haves for me (I even had them in my original sketch!) And lastly, we have the fox pockets. I LOVE foxes right now and the love of them were my main inspiration for this skirt. The thing I love about this is that you can change the color of this dress and add ANY kind of animal/person/etc. and make it completely personal for your child to wear.

After making the dress, I knew I wanted a little more texture under the dress, so I made a really simple ruffled slip to go under the dress.

The shirt was so fun to make.  I started out with a really simple tank top pattern, added some sleeves. I gave them two small pleats at the shoulder (which I am in love with..like I need to make ME one!). I added a ruffle around the neck. Snaps close the shirt all the way down the back and I added 3 simple black buttons and off centered them in the front.

She loved it to pieces and asks me daily when she can wear her fox dress again!


I thought this was such a sweet moment caught at the end of the shoot. Proof that it really is a dress you can move in!

That is a wrap on this week's outfit!
As a bonus, I also have some fun paper dolls to dress in the clothes from this season of Project Run and Play.  You can read about the dolls and download them HERE.


Remember, free downloads are for readers of Kiki Creates only! Did you know I am moving my site soon? Kiki Creates will soon be Kiki and Company...so I am now asking you to "like" my new facebook page, in return for the free downloads. You can find it HERE. Thanks!


Pin It

Thanks for stopping by. I hope you enjoyed a brief look into my design this week.  Remember to jump over and vote for your favorite design...and hope I will be around next week to show you outfit #2!

Friday, March 2, 2012

Baby To-Go Bags

Do you go to a lot of baby showers? I can tell you that I make it to my fair share and am constantly looking for a practical, useful and sweet present that I could give over and over. I think I found it.:)
You all know that I just had baby #4. I would have loved to be given this gift for any of my showers, especially in the newborn stage when life is madness and to just get your kids all dressed and in the car is a miracle somedays, let alone remember to pack everything for the baby! I have been caught in a jam quite a few times unprepared, so this idea makes life so much easier!
Erin Lincoln at Procrastination Station came up with this idea in September of last year, and I kept in my "have to do" project list.  I wanted to make this gift so that I could make it over and over again, though. Something that can be simple enough to just print out and sew and be done.  So I introduce you to:

What are Baby To-Go Bags?  The concept is simply a bag that the new mother can grab on her way out the door that has all the essentials in it ready to go.  Each bag has a diaper, wipes, a onesie (in case of a needed outfit change), and hand sanitizer. As the baby grows you can add to it what he/she would need (food, bottle, toys, etc).  There are four bags and they are numbered 1-4. 

Each has a corresponding onesie that goes with it (the design on the onesie and on the bag match). As mommy goes through the bags, she knows as she gets to number 3 and 4, that she should refill the bags.


Aren't they so cute?!  I found wipes and baby sanitizer in the dollar section at Wal-Mart in travel sizes..perfect for the bags.


I also added in baby growth cards to help mommy see the growth in her baby month to month.


I put it all together in a basket and added a few extra supplies to refill the bags underneath.


And added a card of congratulations. Simple and sweet.


So sweet, right?!  Well, guess what?! You can make your own baby to-go bags now too!  I am selling all of the files I used to make this gift in my shop.  You can choose between a boy or girl designs and will recieve:

4-3 inch circle designs for onesies
4-rectanguler designs for bags
set of baby growth cards
baby to-go and baby growth card tags
congrats card
and the directions to put them all together.

The boy designs look like this:

The girl designs look like this:

These will normally each sell for $15 each. If you buy both the boy and girl designs, you will get them for a discounted rate of $25 (saving you $5).

Remember, each set of files also comes with a set of either boy or girl growth cards:


For one week only you can get the boy OR girl designs in pdf file format for $12 each OR you can get BOTH the boy and girl designs for $20. That is a $10 saving...and imagine just how many cute baby shower gifts you can make with them!

FIND THEM  HERE!

So what do you think? Wouldn't this be a fun gift to recieve?!

Wednesday, February 22, 2012

Little Boot Socks {tutorial}

The other day, Rebecca, from Simple As That put a link on her facebook page to Grace and Lace etsy shop. OH. MY. Are those not the cutest leg warmers and boot socks you have ever seen?! Totally inspired by these, I looked around to see what I had on hand to make my little Maizie her own boot socks.
Do you want to make some?


And that is what I call cute!
Pin It

Monday, September 20, 2010

the flower pillow

 Do you remember this sweet pillow from here?

Well, here is my rendition of it...

I love how they turned out!  I did two different pillows..one for each of my couches..I have never been the matchy, matchy type.
I took the instructions on how to build a basic rose from here..and just sketched out my own pieces..as this was much larger..and I wanted a little different look to it.
I love the volume to it.  I think I used about 13 layers of petals for the rose pillow, and then I used circles glued in half and then into quarters and then all put together for this other pillow.
 
I love, love, love the look of them on my couches. This color is so fallish, so rich, so pretty!  Both pillows took 1 1/2 hours to complete..so it was really quick, and super cheap to make 2 fun pillows to add to the decor!  Don't you think those flowers (a little bit smaller) would be amazing in a fall bouquet?! mmm..I can see it now.:)
Posted by Picasa

a quick way to fix up a blanket

I love to make blankets for new babies.  Some I make more elaborate, some super simple.  This one was one of those super simple ones.  I loved this flannel fabric I saw and so I simply sewed it together with a light cotton (since you can't make the blanket too warm for Vegas!)..but knew it needed something else.


So I cut out a few random felt flowers and sewed them on one corner..
I love this color combo..so girl, but in a funky fall kind of way!


a cute and easy way to dress up a blanket!

NOTE:  I have been using felt for a few years now to do appliques on blankets, onesies, shirts, etc. and love working with it. It's nice and stiff, so it is easy to sew..and cleans up well too, but I normally wash it in the washer and hang dry!
Posted by Picasa