Wednesday, April 25, 2012

I'm Moving!

I am so excited to share that Kiki Creates is now Kiki and Company:
After months of trying to figure out what I wanted, and then figuring it out that that was not what I wanted, I finally buckled down and hired Designer Blogs and they were amazing to work with. I can't say enough good about them.  I love my new site..and you will see some fun things added in the next few days (like a newsletter..yay!).  Head on over, check it out, and bookmark it.  This site will soon be redirected there automatically, but I just wanted to give you a heads up before then.

Thanks so much for supporting me on this journey and for coming along with me.

Tuesday, April 24, 2012

Salsa Times Five! {recipe}


With Cinco de Mayo coming up, I thought I'd share some of my favorite recipes for the big day!  Mexican food has always been my favorite, and I would love to share some of my favorites I have made with you.  This week, salsa is the star!  There are many different ways to whip up a batch of salsa, and the ingredients can vary from anything from tomatoes and cilantro to strawberries and apples!  I love the possibilities...hope you can use a few of these at your Cinco de Mayo parties!


Restaurant Style Salsa

1 can (28 Ounce) whole tomatoes with juice (I drained some of the juice)
2 cans (10 Ounce) Rotel
¼ cups chopped onion
1 clove garlic, minced
1 whole jalapeno, quartered and sliced thin (less if you're not a heat fan)
¼ teaspoons sugar
¼ teaspoons salt
¼ teaspoons ground cumin
½ cups cilantro (or more to taste!)
Juice of 1 lime

Combine whole tomatoes, Rotel, onion, jalapeno, garlic, sugar, salt, cumin, lime juice, and cilantro in a blender or food processor. Pulse until you get the salsa to the consistency you’d like—I do about 10 to 15 pulses. Test seasonings with a tortilla chip and adjust as needed.

Refrigerate salsa for at least an hour. Serve with tortilla chips or cheese nachos.

Recipe Source: Amber's Delectable Delights

Next, a recipe I got from our ward's cooking club.  It is really tasty, and the secret in the dressing...balsamic vinegar!  It adds a yummy tanginess that is addicting.  It is easy to put together and will be a sure crowd pleaser and your summer parties.


Balsamic Black Bean and Corn Salsa

1 (15 ounce) can black beans, drained and rinsed well
1 (15 ounce) can whole kernel corn, drained well
½ medium onion finely diced (about 1/3 cup) (I like red onion better)
½ cup finely chopped fresh cilantro
1 (7 oz.) can salsa verde (I used Embassa brand)
Juice of 1 lime
½ teaspoon cumin
¼ cup balsamic vinegar
Salt and pepper to taste

Mix all of the ingredients together in a medium bowl and cover with plastic wrap. Let the salsa marinate for a few hours (or overnight before serving). Drain most of the liquid from the salsa before serving. Serve with tortilla chips.

Recipe Source:  our ward's cooking club.....via Jessica N.

Next up, a yummy salsa with some fabulous fresh ingredients that everyone loves.  My family has this for get togethers all year 'round.  It is packed with one of my all-time favorite ingredients....cilantro!  Hope you enjoy it as much as we do :)


Fresh Salsa

5-8 tomatoes (personal preference), chopped into small pieces
1 can white whole kernel corn, drained
1 can black eyed peas (or black beans), drained
4 chopped green onions
½-1 bunch of cilantro, chopped
1 env. Italian dressing, mix as directed on package (use red wine vinegar)

Mix all ingredients in large bowl and serve with tortilla chips.

Recipe Source:  the Ladies at the OAC

Next, something a little different.  This isn't your average guacamole.  This is avocado feta salsa.  Ok...maybe it's a stretch, but I'm including it because of how tasty it is!


 I just love feta.  I throw it on almost every salad I ever make.  It is yummy in pasta dishes.  Now, I am throwing it in my dips!  Avocados are definitely affordable this time of year, so I thought it was a good opportunity to try this yummy recipe finally.  It turned out very yummy, and were great with these pita chips. 

So make a batch of this up next time you are headed out the door for a BBQ, your friends and family will love it!  Not to mention you don't have to feel the guilt about eating a mayo or sour cream based dip.  Enjoy :)


Avocado Feta Salsa

1 chopped tomatoes
2 chopped avocados
1 clove garlic, minced
1 TBS fresh, chopped oregano
1 TBS olive oil
1 TBS white wine vinegar
6 oz. crumbled feta cheese
(can add diced red onion, if desired)

In a bowl, stir together the chopped tomato, avocados, garlic, and oregano (and 1/4 cup red onion, if you like). Gently stir in olive oil and white wine vinegar. Stir in feta. Chill for at least a couple hours.
Recipe Source: One She Two She

Lastly, why not share a fruity type salsa!  This one I came across and was immediately sucked in by the idea.  Pineapple salsa...why not!  Depending on how spicy or sweet you want it, just add less jalapeno. It goes great along your favorite tacos, burritos, or enchiladas.


Pineapple Salsa

2 cups chopped fresh pineapple (1/4-inch dice)
juice of 1 lime
1 handful cilantro, chopped
1 jalapeno, chopped
Salt

Instructions

Place all ingredients in a food processor and pulse 2 or 3 times. This will give you the crushed pineapple texture. For a chunkier salsa, stir all ingredients together and salt to taste.

Chill in the fridge until ready to serve.

Recipe Source:  Foodie Bride

Happy Dipping!
britni
http://myrecipeboxx.blogspot.com/

Pin It

Monday, April 23, 2012

Chocolate Covered Cinnamon Bears {recipe}

WARNING: This treat is highly delicious and addictive.

Can a treat that simply has 2 ingredients be considered a recipe? Either way..here is one of my favorite yummy quick desserts that everyone in my family loves!

Simply get a bag of Cinnamon Bears and a bag of milk chocolate chips. (I like Hershey's the best).  Melt the chocolate in the microwave, and then hold the bears head while you dip the body. Place on a piece of wax paper or foil and let harden...if it even makes it to the foil!

One bag of chocolate chips can dip 2 whole bags of cinnamon bears.

Don't say I didn't warn you. (see warning above)

Pin It

Friday, April 20, 2012

Knickers and Roses {Project Run and Play}

Wow..can you believe it has been another week again?! Welcome, if you are here for the first time. Hope you will stay and look around for a bit!  I was so excited when I heard that Week 2 for Project Run and Play was Sportswear.  The first thing that came to my mind was a modern, yet vintage golfer.  Funny how my brain works sometimes, but I ran with it, and this is what I came up with:


My husband was the genius behind the name of the outfit this week. Don't you love it?
 My biggest goal this week was to make the clothes comfortable, interchangeable, and easy to move in.  
When I was a little girl, I wore knickers constantly. I love them because you can wear them in the spring and summer with no socks or in the winter and fall with socks and they work! The knickers were made from a lightweight cotton (we do live in Las Vegas, so I wanted to make sure my daughter could wear them year round!).  I added the button detailing on front to give it more of a vintage feel and they ended up being one of my favorite details!  I also adore the button closures at the knee.

Next up is the shirt. It was made with a lightweight knit, so I doubled it so it wasn't transparent. It is a very simple shirt, but by far my favorite detail is the pleating detail I put on the shoulder. I love that she can wear this plain as well and show that off!


Last we have a sweet little vest. I knew I wanted to pleat the bottom and by lining it in a contrasting fabric, you can catch little glimpses as she moves..love that! This was made from a t shirt pattern. I left off the sleeves and then cut the front right down the middle and then made the new shape!


Lastly I made some sweet hair accessories and a belt that coordinated and brought everything together. These belts are so fun to make. You can find my tutorial for them HERE. They are so great to add to any outfit for a pop of color.


And here are a few outtakes from the shoot. My daughter had such a great time swinging that vintage wooden club around.

Not a bad swing form for a 3 year old, right?! (Maybe I'll get to make more golfing outfits in the future...):)
So there you have it..a bit of what went into this week. I'd LOVE your vote over at Project Run and Play. You can vote through Sunday evening!

And of course, here is the paper doll outfit this week:

How cute is she? Find the outfit HERE.

Remember, free downloads are for likers of the NEW Kiki and Company page on Facebook. You can find the page HERE. Thanks!

Thanks for stopping by.

Pin It

Thursday, April 19, 2012

Allure Beauty Blogger Awards


boy, do i have some exciting news to share. i am among 15 finalists selected by Allure Magazine to compete as the Allure Beauty Blogger of the Year  (blogger-awards.allure.com). wowza!


for the next several weeks, i will be competing in challenges where the winner is selected by public vote. each week i will share my challenge assignment with you, as well as the link for voting so that you can help me win.


the Allure Beauty Blogger winner will receive a special feature in Allure Magazine, the opportunity to go behind the scenes at New York Fashion Week and be named Allure's Beauty Blogger of the Year.


in addition, i will be hosting a weekly giveaway at blushingbasics.com where entries are earned by voting for me at Allure.com.


just being selected to compete has been an honor, but winning would be a dream come true. please help me make this possible! the first challenge begins Monday, but for now you can help by taking two seconds to visit my Allure profile page and "Like" me - http://blogger-awards.allure.com/blogger/8.


xo,
kristie


www.blushingbasics.com

Wednesday, April 18, 2012

April AND May Calendar! {Free Download}

I am so sorry these April files are coming so late. However, you also now have the May files nice and early! Enjoy away.


Remember free downloads are for "Likers" of the new Kiki and Company page ONLY! Click here to take you to the page to "like" it! Thanks so much.

Pin It

Tuesday, April 17, 2012

See me at See Kate Sew!

Today you can find me over here:

For this always AMAZING event:


See you there.:)

Copycat recipes pt.2 {recipe}

Ready for another round of COPYCAT recipes?!  There really is nothing like making something yourself that tastes just like one of your favorite menu items from your favorite restaurants!  Not to mention you can do it at home for a fraction of the cost!  You just can't beat that.
This first yummy recipe is a copycat from a place called Rumbi Island Grill, which you can only find in Utah, Colorado, Arizona, and Nevada.  Being in Ohio, it's not easily accessible when I have a craving!  It's a good thing I've found some great copycats to fulfill my craving, this one included.  I have made it 4 or 5 times now, and it is delicious (and figure friendly).  The recipe looks long, but don't let that intimidate you, it comes together really easy :)


Hawaiian Spicy Chicken Teriyaki Rice Bowl with Rumbi Rice
1 Tbsp. vegetable oil
4 carrots, peeled and grated (I cut up some baby carrots, it's what I had on hand)
3 celery stalks, washed and sliced
1 zucchini, chopped into small cubes
1 1/2 c. chopped broccoli florets
2 c. chicken, grilled and cut into small cubes  (I boiled mine this time, I'm sure it's even better grilled!)


*Rumbi Rice (see recipe below)

**Spicy Hawaiian Teriyaki Sauce (see recipe below)

Heat vegetable oil in a large skillet over medium-high heat. Add carrots, celery, zucchini, and broccoli (pretty much equal parts of said vegetables.. you can add more or less veggies depending on your taste). Saute ONLY until vegetables are crisp tender. About 1-2 minutes tops. Serve over Rumbi rice and top with chicken. Serve with Spicy Hawaiian Teriyaki Sauce on the side (about 3 Tbsp. per bowl.. you can add more or less depending on your taste).

*Hawaiian Coconut Rice with Red Beans (aka Rumbi Rice)

2 c. long grain white rice
2 1/2 c. water
1 (14oz) can coconut milk (about 1 1/2 c.)
1/2 Tbsp. sugar
1 can red beans, drained and rinsed

Combine all ingredients in a rice cooker. Gently stir it all together so the beans are all mixed. Place the lid on and start the rice cooker. Fluff rice with a fork before serving.

If you don't have a rice cooker... Combine water, coconut milk, and sugar in a saucepan. Stir in rice and beans. Bring to a boil over medium heat. Cover, reduce heat, and simmer 18 to 20 minutes, until rice is tender. 

**Spicy Hawaiian Teriyaki Sauce:

3/4 c. Mr. Yoshida's teriyaki sauce (found in the grocery store by the BBQ sauces)
1 tsp. soy sauce
2 tsp. chili garlic sauce (in the Asian section of the grocery store.. we used Sriracha-- if you want to make it spicier.. add more of this to the sauce)
1 tsp. fresh ginger
pinch of salt
pinch of brown sugar
1 Tbsp. cornstarch
2 Tbsp. cold water

Combine Yoshida's, soysauce, garlic sauce, ginger, salt, and brown sugar in a small saucepan. Bring to a boil and then reduce to a simmer. Combine cornstarch and water and SLOWLY add to sauce for thickening. You want it to be slightly thicker than the Yoshida's sauce. Allow to simmer for about a minute. Cool to room temperature and serve with your rice bowls. (If you find that the sauce is too thick when it cools, just add a little more Yoshida's to it)

Recipe Source:  Favorite Family Recipes


Next up....who loves CPK!?  For those of you who are not following, I'm referring to the California Pizza Kitchen.  I usually am a sucker for their amazing salads, but their pizzas are phenomenal as well.  This version turned out really well, and I love the zucchini that was in it.  The peanuts and the cilantro made it, in my opinion.


CPK's Thai Chicken Pizza

1 ball pizza dough (see recipe below)
Olive oil, for brushing
¼ cup sweet Asian chili sauce, plus extra for drizzling
1 shallot, thinly sliced
½ large zucchini, thinly sliced
1 tsp. red pepper flakes
1 cup shredded cooked chicken
2/3 cup shredded mozzarella cheese
3-4 tbsp. chopped peanuts
2 tbsp. minced fresh cilantro
2 tbsp. minced fresh basil (optional)

To make the pizza, increase the oven temperature to 500˚ F and preheat a pizza stone.  Roll out the pizza dough into a 12-14 inch round.  Lightly brush the perimeter of the dough with olive oil.  Spread the chili sauce over the crust in an even layer.  Layer with the shallot, zucchini, red pepper flakes, shredded chicken, and cheese.

Transfer the pizza to the preheated pizza stone and bake until the cheese is melted and bubbling and the crust is lightly browned, about 10-12 minutes.  Remove from the oven and let cool slightly.  Sprinkle evenly with the peanuts, cilantro, and basil before slicing and serving.

Recipe Source:  Annie's Eats

Pizza Dough

1 c warm water, divided
1 tsp sugar
1/4 oz package active dry yeast (or 2 1/4 tsp.)
3 Tbsp oil (olive oil or vegetable)
2 ½-3 c flour
1 tsp salt

Put warm water in bowl. Stir in sugar and yeast and let proof for 1o minutes. Stir in rest
of ingredients. Mix until a ball, knead 10 minutes. Put additional oil in bowl and let rise in oil bowl for 1 ½ hours.

When dough is ready, press out onto pizza pan.  Preheat oven to 425 degrees.  Spread Alfredo sauce over dough and spread garlic over sauce.  

Layer chicken, spinach, bacon, mozzarella, then Parmesan cheese.  (You can brush crust with butter and dust with garlic powder...it is really good :)  Bake for 15-18 minutes until cheese gets bubbly.


What copycat recipes do you love?

britni
http://myrecipeboxx.blogspot.com/

Find other copycat recipes HERE.

Pin It

Monday, April 16, 2012

bow tied shoes {tutorial}

First of all, THANK YOU so much for voting for my sweet little fox dress at Project Run and Play this weekend. We made it on to round 2! Yay!

When I was coming up with my first look for Project Run and Play, I needed some cute shoes to top it off. (or maybe I should say bottom it off!):)  I had a great time coming up with these:
I knew I couldn't spend a lot of money on them. Guess where I found these cute little things..WALMART! For a mere $8, I knew I could make something cute.
I took off the bows, and using the same polka dotted material as the shirt, I whipped up some bows using THIS tutorial.  I just hot glued them on and had some super cute shoes for a cute little outfit!

Easy, cute, and cheap custom shoes.


Pin It

Friday, April 13, 2012

I'm A Fox Dress..Project Run and Play

For those of you here from Project Run and Play, welcome! It is so fun to have made some new friends from this experience already and can't wait to meet more.  For those who don't know, I was invited to take part in an online sewing competition for children, Project Run and Play, where each week designers have a theme to design an outfit around and then are voted on each Friday and Saturday to determine the winner!  Head on over to Project Run and Play and check it out and VOTE! I'd love your vote, but know there are a lot of talented designers this season, so head on over for some great inspiration.

This week our theme was to remix the Circle Skirt by Dana from Made.

The circle skirt is such a great skirt to sew...for all sewers, but is a great beginning project for someone just learning to sew.  I LOVE the drape on this skirt and as part of my design, that is one thing that I knew I wanted to keep. Here is my original design in sketch format:


and here is what it turned into: 


My daughter is bursting to the brim with personality and  I love to make outfits to show it off. She was so funny for this photo shoot as you can see, but it really was perfect for the feel I was going for!

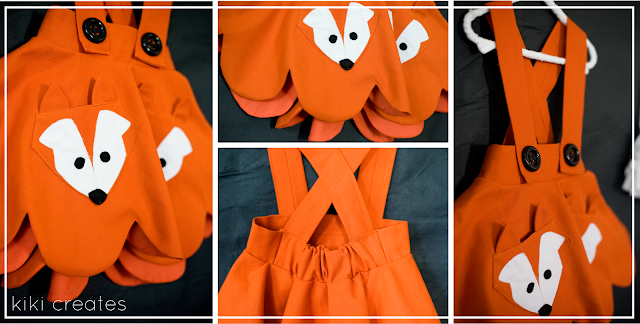
In remixing the pattern, I kept the skirt base the same, but added large scallops along the bottom.  The skirt is made from a denim and lined with a cotton, which made the scallops so easy to make. You will laugh when you hear how I do things sometimes. (My husband laughs a lot!):) To make the scallops, I searched my house high and low for every circle we had and found the perfect bowl that fit the size scallop I needed to make an even amount of scallops. Unconventional? Certainly. Did it work? Yes, it did!  I made a simple band for a waistband with a plain front and added elastic to the back. 2" suspenders were made and attached in the back, criss crossed and then snap close in the front. The large buttons were must haves for me (I even had them in my original sketch!) And lastly, we have the fox pockets. I LOVE foxes right now and the love of them were my main inspiration for this skirt. The thing I love about this is that you can change the color of this dress and add ANY kind of animal/person/etc. and make it completely personal for your child to wear.
After making the dress, I knew I wanted a little more texture under the dress, so I made a really simple ruffled slip to go under the dress.

The shirt was so fun to make.  I started out with a really simple tank top pattern, added some sleeves. I gave them two small pleats at the shoulder (which I am in love with..like I need to make ME one!). I added a ruffle around the neck. Snaps close the shirt all the way down the back and I added 3 simple black buttons and off centered them in the front.

She loved it to pieces and asks me daily when she can wear her fox dress again!


I thought this was such a sweet moment caught at the end of the shoot. Proof that it really is a dress you can move in!

That is a wrap on this week's outfit!
As a bonus, I also have some fun paper dolls to dress in the clothes from this season of Project Run and Play.  You can read about the dolls and download them HERE.


Remember, free downloads are for readers of Kiki Creates only! Did you know I am moving my site soon? Kiki Creates will soon be Kiki and Company...so I am now asking you to "like" my new facebook page, in return for the free downloads. You can find it HERE. Thanks!


Pin It

Thanks for stopping by. I hope you enjoyed a brief look into my design this week.  Remember to jump over and vote for your favorite design...and hope I will be around next week to show you outfit #2!