

After getting email after email about my rosettes from THIS wreath, I decided that this tutorial was a long time coming:

Here is what I use to do my rosettes:
Strips of fabric ranging from 2-5 inches wide and 20-36 inches long (both of these depend how thick and big you want your rosette!
hot glue
and
felt circles (I like using smaller 3/4"-1" circles)
That is all you need. Let 's get started.

1-Knot up one end of each of your strips. 2-glue it to the center of your felt circle 3-place a strip of hot glue at the bottom of the felt, but next to the fabric. 4-wrap fabric over the glue and press your finger gently on the glue to make sure it sticks. As you press the strip to the glue, simply twist the fabric over one time. (a lot of rolled flower tutorials have you twist and twist as you glue, but I like the fuller, more layered look on the flowers, so I simply twist the fabric one time each time I glue. Play with it and see which you like better.

5-This shows the twist a little better. 6-THIS IS THE MOST IMPORTANT IMAGE TO SHOW MY STYLE OF ROSETTE. Why, you ask? Simply so you can see how I hold and manipulate my strip. Each side of the strip is folded into the center so it is wide and thin..versus the usual thick and round strip from twisting over and over. 7- after you put some glue down..take your strip and pull it around the flower, then remember your simple fold over..then glue..strip around the flower and twist over...over and over.. 8-You can make all of the twists at the same place or stagger them for a more layered look

9-This shows the correct placing of the hot glue..you don't want it too high or it will squirt through the top and you will have a goopy mess..or worse..see glue on top!:) 10-And here is your finished rosette. This one I lined the twists up. 11- White rosette I staggered the twists more.. 12- Just wanted to show you that you don't just have to use large pieces of fabric..here is a shirt cut up..see the snap!:)
Keep going and you will soon have:
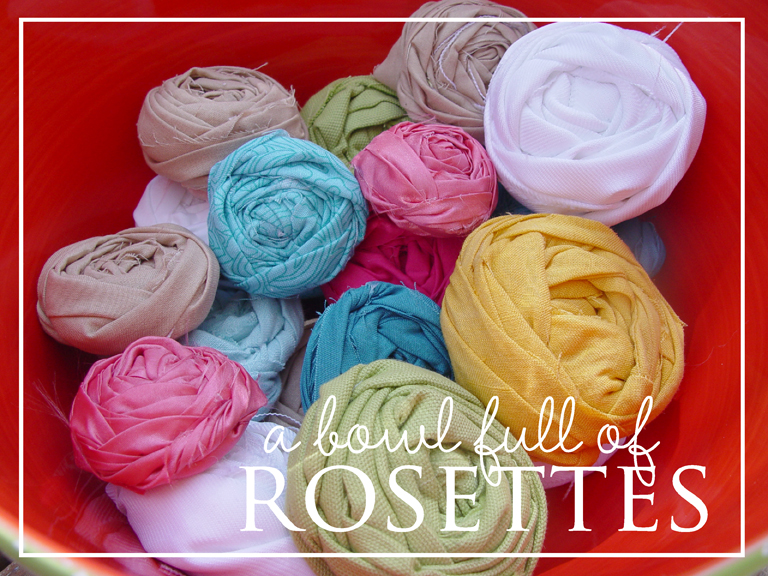
I promise, the more you practice the faster you get. I rolled all 22 of these rosettes in just over one hour! Can't wait to show you what I am doing with them.:)
and to end on a fun note..so excited to be going here this weekend:

26 comments:
I voted for this wreath becasue I loved the colors and funky style! Thanks for the tutorial. Kiki, I always enjoy your posts and tips. Your blog is full of fun ideas and doable inspiration with I love and appreciate! I'm highlighting Kiki Creates on my blog today. I'd love it if you checked it out!
so cute! we are actually making these w/ the YW tomorrow on the ends of bobby pins! i'm glad i got to see your version before we make them! great tutorial!
oh my gosh. so cute. i can't wait to try these! so cute on a headband or a pin. or picture frame. or in a bowl! :) thanks for the great tutorial!
So fun! Thanks for sharing your techniques. I'm going to give it a try and go very sloooowly. :)
Those are so pretty! I love how you used the felt base!!
These are great! I tried making some similar at http://bingecrafter.blogspot.com/2011/03/easy-fabric-rosettes.html but I made them into hairbows. I didn't make them using a felt circle, though, which I think might be easier & better. Yours look great! By the way, I love the text & borders you put on your pictures. They look fantastic! Thanks for sharing!
Angela
bingecrafter.blogspot.com
Great tutorial! These are gorgeous!
GREAT tutorial - I have been wanting to try these for ages and this is a great way to start!
Visiting from Tatertots & Jello
These are great! I have been wanted to try to make some of these and I love your way of making them. Gluing the knot down and then winding is just fabulous!!!
www.thegunnysack.com
Thanks for posting this tutorial, I'm adding it to my favorites! Visiting from Tatertots & Jello.
Thank you for this! I've been looking for an easy tutorial for these. I'm going to make some this weekend! I'd love to have you link this to my VIP party today! http://designergarden.blogspot.com/2011/03/vip-party-9.html
I love the idea of using the felt base. I have been learning how to make these and sometimes after rolling and twisting its a mess. Thanks for the tip !!!! I love your wresth too.
Thanks for sharing the great tutorial. Love all the pretty colors you used. Have a great day, Vicky
I made a bunch of rosettes a few weeks ago just because I went on this rosette kick. I never would've thought of just throwing them into a bowl to display! Great idea! Love your work!
My dear...you are unbelievably talented!! It was soooo fun meeting you last night. We need to do that again soon!!
kisses
heather
Thank you for posting this rosette tutorial. Just made my first one using your technique & love it!
Thank you so much for the tutorial. My sister has been bugging me for weeks to teach her how to do this, but I didn't know how! :) I just featured it on my blog.
Lois
www.auntielolocrafts.blogspot.com
Very good tutorial! I would love to link to this and show off your method at my blog, Thymely Stitches. You do great work!
Thank you so much for the great tutorial - I saw a link on another bloggers site and had to come right over! Adorable :)
Very nice!!! I've been wanting to make this for a long time thanks for the tutorial.
I followed your tutorial tonight and it was so much fun! While mine don't look quite like yours yet, I loved them! Oh and holy cow do I have some major hot glue gun burns!! Totally worth it though! :)
Lois aka Auntie Lolo
Hurray -- you've really explained some things differently. I was having trouble getting "the look" I wanted.
Thanks so much!!
thanks for doing this tutorial!! i'm glad you liked how mine turned out :D
I have been trying to make my flowers look like yours without success. Thank you for posting this tutorial. I just love your rosette wreaths!
bravissima!!!! look my blog!
Very pretty love all of the colors and your tutorial is great!
Post a Comment