

Whew..this one has been a long time in the making! After a hundred (yes, I really do mean a hundred) of emails and comments asking how exactly I made those ruffles:

FINALLY, here are the specific directions on all 4 of them.


{Raw Edge Single Ruffle}
You will see this ruffle has a faux raw edge, as you really are going to zig zag stitch down the two sides of the ruffle. This will make it so it will not unravel, but it still has that raw feeling.

1- Take your strip of fabric.. (this is what you have to figure out on your own...I had strips 4" all the way up to 9" wide to start out..some I made into tubes, others I left alone...I think a good rule of thumb is to have a good mixture. The length of the strip will depend on the size of your duvet. Usually I made my starting strip be about 3-4 times the size of the ruffle I was putting down.)..and zig zag stitch along the outside of your ALL of your raw edges. For those who haven't sewn a zig zag stitch, I just placed my width at the highest setting, and my length I kept at about 2.5. All machines will vary..most now will have a simple zig zag stitch function. I like my zig zags to be closer together, but wider, so that is the setting I went with. When sewing a zigzag stitch, keep your material going through the center of your foot (see image 1) 2- This is what your edge will look like when you finish stitching it. 3- Now to the ruffling. I ruffle simply by pushing more fabric through the foot than what it normally grabs. Keep your fingers moving, and remember..ruffles do not have to be perfectly spaced! If you bunch more at one part than another..no big deal. The more ruffles you do, you will find your own technique that works best. As I push the fabric through, I simply keep sewing at a slow speed..the more I have done, the faster I can go! 4- Keep sewing a straight line through the center of the strip until you are done. The finished strip should look like the top picture!
{Raw Edge Triple Ruffle}
You will do all of your steps the same with this ruffle as with the Raw Edge Single Ruffle..and then you will add:

1-After sewing the middle line through the center, go to the right of the center line to the middle from the edge to the center and start sewing again. I like to make this ruffle a lot wider, so you may have to ruffle just a little as you push the side seams through, but mostly just let the machine do the work! 2- After doing the right side, I turn it upside down (not over) and stitch the other side the same way. When you finish there will be 3 lines down your ruffle. When sewing this on to your duvet, sew over the center line!
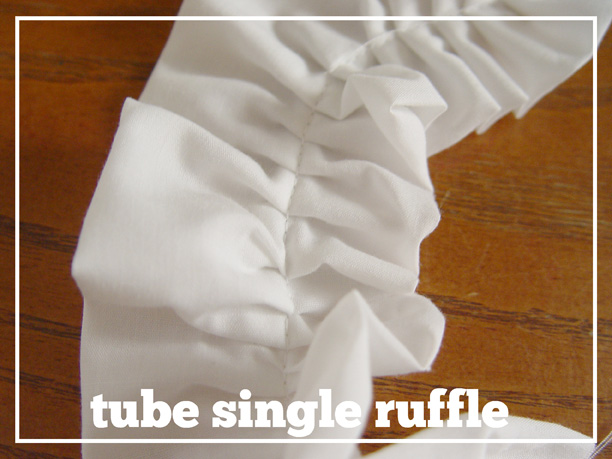
{Tube Single Ruffle}
These ruffles are easiest sewn on strips 6" or bigger, though I did use a few 4" strips on my duvet cover for added volume!

1- Take strip of fabric and sew right sides together to form a tube 2- Turn right side out. 3,4-
Start sewing and once again, push more fabric through faster than the machine will feed it! 5, 6- the faster you feed it the more ruffles you will have, the less, the more spread out your ruffle will be!
Note that these ruffles will be harder to push through as they are thicker! However, having various sizes of these really adds a LOT of volume to your duvet cover!
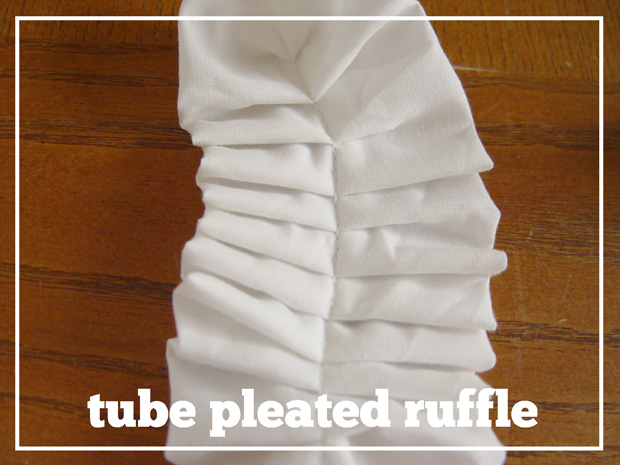
{Tube Pleated Ruffle}
You will notice that this one has fairly even ruffles and this is achieved by pleating the tube.

1- Once again, follow steps 1 and 2 of the Tube Single Ruffle to get to the starting point of this ruffle. Take your material and start sewing in just a bit. Stop sewing, lift your sewing foot, grab just a bit of fabric..I did about 1/2" on this ruffle 3- Fold it over on it self and on the pleats ahead of it 4-Lay down your sewing foot again and sew over the pleat. Repeat over and over until you get to the end of your strip. This one is definitely the most time consuming ruffle, but again, gives variety of texture and look to your duvet...(you didn't want every single one of them the same, right!):)
And there you have it. I did 12 rows of ruffles on my duvet cover of varying widths and ruffles and it came out, just as I wanted it!

Yay! Now go and make one and send me a link! I'd love to have a party in a few months and feature YOUR duvet cover. Once you make one, send me a link and I will keep it on file! If you have sent me one before this, I would just ask that you send it again and I will file it away this time!:) Thanks for being so patient with this tutorial!
18 comments:
Oh I am so excited :) Thank you!!!!!!
Thank You so much!! i am going to be using your guidance to make the entire comforter ruffles (like the other Urban Outfitters ruffled duvet). I'm totally regutting my bedroom and I have you to thank as an inspiration :] I'll post pictures on my blog as soon as I'm done (hoepfully starting this weekend).
I was one of those hundred emails and I'm so glad you got the tutorial up! All of my material is here and ready to go and I will be starting on mine tonight! Thanks so much, you will def be getting a picture from me when it's done!
I am excited to go home for a visit for many reasons but one of them is so i can use my mom's sewing machine to make this!! Sadly I don't have one:(
You are so awesome!! Thank you so much for posting this, and for your clear explanations. :)
i <3 ruffles!! gorgeous!! thumbs up :)
happy crafting!
Linda
This is SO fabulous!!! I've had my eye on the rose colored duvet for a while now, and I am beyond impressed that you made your own version. You are quite talented my friend!
Just gorgeous! I linked this to my ruffles post too, well done!
this is amazing! so beautiful!
YAY!!! I just got my ruffle supplies today so hopefully I'll beagle to bust out a duvet soon! Thanks for the awesome tutorial! I will share when I'm done!
Kiki, this is SO gorgeous!! I featured you on my Wednesday's Wowzers today...
http://www.oopseydaisyblog.com/2011/07/wednesdays-wowzers-join-me-on-pinterest.html
Thanks for inspiring!
~Alison
Awesome - I found your site by googling "how to sew a ruffled duvet cover" I've been wanting to make one for my daughter but wanted to see what others out there are doing before I started. You have some good ideas for mixing up different types of ruffles so I'm glad I found you. By the way, to all who have questions about sewing ruffles, if you use a cotton knit fabric, as I am going to, set your stitch to the longest setting and your tension to the highest setting and the strip of fabric will ruffle beautifully all by itself as you sew down the center (or the edge, if you like) I'll plan to send you a photo of my finished duvet
very cute love it..i want to do that on a tee shirt so that just maybe helpful. forund you through pinterest...great blog.
Oh, I am in LOOOOOOVVVVEEE! This is just gorgeous. I just saw one online but they were all sold out and here you have made your own and exactly like the one I saw. thanks a ton, I know tutorials are a lot of work.
Another easy way to ruffle that I've used is to put your machine on the straight stitch. Then put the length to the highest setting (a 4 on my machine), and put the tension up to the highest setting (a 9 for me). You don't reverse stitch at the start or finish so that you can ruffle the fabric more or less. Hope that makes sense.
This is a gorgeous replica of a Cynthia Rowley comforter that I fell in love with 2 years ago! Not only was it rare at the time, but it was also $200- much more than I could bring myself to spend! My boyfriend just got me a sewing machine for my birthday, and I'll be teaching myself simpler projects in the coming months... This will be my "dream project" that I'll be striving to improve my skills for! Thank you so much for sharing this with everyone!!!<3
So glad I came across your blog through Pinterest. Thank you for sharing the tutorial on how to create ruffles. I have made ruffles,but your way seems so much easier. I am going to try making my own comforter filled with ruffles. Love your blog too. :)
Janet Bernasconi
Janet's Creative Pillows
www.janetcreativepillows.blogspot.com
Really awesome tutorial. I love the finished product!
Post a Comment